
# High Level Overview
Before we get started, it's important to understand what everything is doing.
TIP
This page roughly mirrors the tuning guide on Road Runner's official quickstart, with the addition of my own personal tuning tips derived from my own experience. Consider reading the original for a more thorough overview.
https://acme-robotics.gitbook.io/road-runner/quickstart/tuning (opens new window)
Road Runner handles all the fancy math to get everything up and running. However, you must tune everything so it handles as smooth as possible for your specific bot. Different bots with varying motors, weights, etc, all contribute to discrepancies in drive train behavior. Thus, one must follow the tuning guide to ensure that your drivetrain behavior is properly characterized.
WARNING
Significant changes to your bot (addition of a heavy mechanism, etc.) will necesitate a retuning. Although the tuning process should be much faster, this is recommended to ensure consistent behavior.
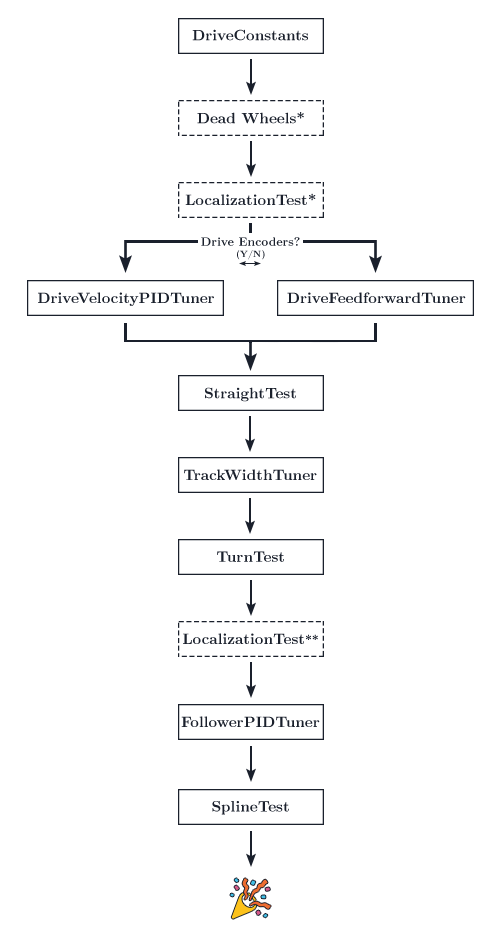
Please follow the guide in order, making sure that every step is completed before proceeding to the next.
# What's Feedforward?
The feedforward velocity control is an open loop system that will attempt to create a function translating voltage into velocity using specified drive characteristics. While this does present the issue of lack of live feedback to the drive process, its counteracted by the translational PID, which corrects for error.
# Where is DriveVelocityPID?
DriveVelocityPID has been Archived as it should not be used. Read why here.. Use the Feedforward method whether or not you have drive encoders or odometry.
Are you using drive encoders?
Nope
Yep
# Drive Constants
The drive constants file will include everything regarding the physical characteristics of the bot. This includes motor's max RPM, wheel radius, etc. Most egregious errors in the process manifest themselves in this stage. For example, if your robot is traveling half the distance specified, this is most likely a problem in your drive constants.
Further details on how to use this will be provided in the drive constants page.
# Dead Wheels
If your bot has dead wheels, they should be configured after editing your drive constants. If not, ignore this stage. Don't know what dead wheels are? Check out the example in the FAQ. Tuning of the dead wheels should be performed in the following localization test. Proper tuning of the dead wheels is very important for accurate localization and following.
Your configuration will depend on whether you have two or three dead wheels. Don't know the difference? Check the FAQ.
Further details on how to use this will be provided in the dead wheels page.
# Localization Test*
WARNING
This first Localization Test should be used to test/tune your dead wheel localization. You should skip this localization step if you have chosen not to use dead wheels.
Running the localization test and driving the robot around the field will allow you to find any discrepancies with your bot's localization. Dead wheel localization should be tuned after configuring your dead wheels. Accuracy of the path following will be dramatically affected by the localization accuracy.
If you are not using dead wheels, you will perform the localization test later.
Further details on how to use this is included in the dead wheels page.
# DriveFeedforwardTuner
If you choose to opt for the feedforward method, the feedforward constants should be tuned.
The official quickstart comes with an automatic tuner and a manual tuner. However, some find that the automatic tuner does not produce optimal results. The automatic tuning process is as follows (taken from the official docs):
To find
kVandkStatic, the robot executes a quasi-static ramp test where the voltage is slowly ramped up to minimize acceleration (it's effectively zero). Throughout this procedure, the velocity and voltage are recorded. In the corresponding velocity vs. voltage graph,kVis the slope andkStaticis the y-intercept. Next, to findkA, the robot attempts to accelerate rapidly from rest. This time, the acceleration, velocity, and voltage are recorded. The velocity is used to determine the acceleration-only voltage. The acceleration is then graphed against this new voltage, and the resulting slope iskA. This procedure is implemented in DriveFeedforwardTuner. The DS telemetry prompts will guide you through the process. If you want to do some analysis yourself, the tuner also saves the data to /sdcard/RoadRunner on the RC.
The automatic tuner seems to produce really low kA values. Thus, I would personally recommend going with the manual tuning route.
Further details on how to use this will be provided in the feedforward tuning page.
# DriveVelocityPIDTuner
skip me
WARNING
Do not follow this tuning path. Use FeedForward tuning instead.
The DriveVelocityPIDTuner opmode is used to tune the Rev Hub's built in motor velocity controller (the RUN_USING_ENCODER mode). It is imperative your PIDF coefficients be tuned for optimal, consistent behavior. These PIDF coefficients should be tuned after any large modifications to the bot affecting weight.
Go through the velocity PIDF tuning process (detailed in the drive velocity pid tuning page). You can adjust the PIDF gains to get your desired behavior. The official Road Runner docs recommend that you should "prioritize eliminating phase lag even at the cost of some extra oscillations." However, I personally feel that it is better to try and minimize oscillations, especially towards the zero velocity. I found that eliminating phase lag, especially at high speeds, would cause very jittery motion, most likely due to the Rev Hub's odd motor control. Hit us up in the FTC Discord (opens new window) if you are interested in further technical details. My personal advice would be to minimize oscillations and allow for the translational PID to fix any phase lag discrepancies.
Further details on how to use this will be provided in the drive velocity pid tuning page.
# Straight Test
Straight test is used to determine how effective your feedfoward/velocity PID tuning turned out. Run the StraightTest opmode a few times. If the bot consistently reaches the same measurement a few times within an inch or two, these tunings were successful. It does not need to hit the exact spot each time as you will later enable closed loop feedback using localization.
If you are utilizing only drive encoders without dead wheels, you will be tuning your drive encoder localization in this step.
Further details on how to use this will be provided in the straight test tuning page.
# TrackWidthTuner
Track width is the distance from one wheel to the parallel wheel. Although this is a physical measurement, the effective track width will differ from real world measurements due to a number of possibilities. To account for this discrepancy, run the TrackWidthTuner opmode to compute the empirical track width.
You will find that TrackWidthTuner will only get within an inch or so of your desired empirical track width. You will most likely need to hand-tune the track width by running the TurnTest opmode and editing the track width in the drive constants.
Further details on how to use this will be provided in the track width tuning page.
# Turn Test
Run the turn test to confirm your track width is correct.
Further details on how to use this will be provided in the turn test tuning page.
# Localization Test**
Running the localization test and driving the robot around the field will allow you to find any discrepancies with your bot's localization. Drive encoder localization should be tuned in the previous steps. Accuracy of the path following will be dramatically affected by the localization accuracy.
The second localization test will be used to test the accuracy of the drive encoder kinematics. Skip this step if you tuned your localization for dead wheels earlier.
Further details on how to use this will be provided in the localization test page.
# FollowerPIDTuner
You will tune two PID's in this step, the heading PID and the translational (x/y) PID. This enables closed-loop feedback control to ensure accurate path following. Run the BackAndForth opmode to get a rough tuning of both the heading and translational PID. Then, further fine tune using the FollowerPIDTuner opmode.
Further details on how to use this will be provided in the follower pid tuning page.
# Spline Test
After everything is tuned, your bot should follow spline paths accurately. If spline test goes wrong, identify the problem and go back to the respective step and retune. Don't be afraid to ask the FTC Discord (opens new window) if you're stuck!
Further details on how to use this will be provided in the spline test page.